Stable
1.10.10117
Daily-driver build with the safest release cadence.
- Updated
- 3 days ago
- File Size
- 536.7 MB
- Release Notes
- Open notes
Stable is the recommended track for most users. Alpha gets you the newest capabilities first.
Daily-driver build with the safest release cadence.
Fastest release track with the newest features and experiments.
Every release stays linked here so you can inspect what changed before you switch versions.
Let's welcome a new node which is accessible in Macros and BTs. It is the first one in the batch of nodes coming soon, nodes, focusing on computer-vision. Those nodes will be a direct replacement of triggers, which you're currently using in Auras. Migration process will take a lot of time and probably new Nodes will reach feature parity with corresponding Triggers only months from now, but eventually we'll get there.
Note, that Nodes DO NOT tick on their own. Image capture and analysis happens exactly at the same moment when the node gets executed.

Initially, performance of nodes could be worse than those that we had in Triggers - this is due to new mechanisms which were implemented for Computer Vision API which powers those new nodes.
New Nodes will be writing their results to Variables which are available via Bindings.
For now, there is a single variable CvLastFoundRegion which will contain the last found region. This could be coordinates of a found pixel. Or coordinates of found image. Or ML class.

In MouseMove, there is now a new button, which allows to very quickly and easily use that variable as a source of coordinates.

Just click on the button, and, when executed, MouseMove will try to read coordinates from that variable.

Implementing a first prototype of the system which should allow to use CV API in BTs and Macros. The general idea is that now those methods which you call, be it ImageSearch/ColorSearch/etc, will cache underlying capture/processing mechanisms, which should make consequent similar calls from other parts of the program be much-much cheaper. We're talking seconds VS milliseconds here.
The mechanism tries to track which parts of the program use different parts of CV API and cache them accordingly. Monitor memory usage! Usually such systems tend to memory leak. A lot. Especially until properly tuned.
This API by itself is still very rough on edges and will be improved in upcoming releases.
This method is now part of Computer Vision API and allows to entirely bypass caching mechanism if you do not need it - e.g. your entire program is a single C# script. In that case it does not make sense to rely on EA caching mechanisms and pay extra (yet small) price for it
Clear() method to MiniProfilerin the latest version I've enabled nodes such as Cooldown/Selector/Sequence for use in Macros as well. The assumption was that it will allow to create rotations a bit easier and bring in BT-goodies to Macros as well. First testing has shown, that this functionality still needs more time in the oven as it raises too many questions, especially around drag'n'drop functionality.
I've disabled those nodes for now and they will become available later, as soon as UX around them will be ready.
The macro system has received significant upgrades, expanding both its functionality and the number of supported operations. In practice, behavior trees have proven to be fairly complex to grasp, while Macros were always meant to occupy the niche between very simple auras and more sophisticated behavior trees. These changes aim not only to reinforce that position but also to incorporate many of the strengths from both Auras and Trees.
Let’s dive in:
This is the core concept from the Auras system. When something happens, a trigger fires. Then, in the aura, the following blocks are called sequentially:
This combination of blocks can describe many situations and automate gameplay. However, it often lacked flexibility — for example, it wasn’t possible to add additional conditions within blocks or repeat actions multiple times. Auras simply weren’t designed for that, but these features are fundamental to Macros.
The one thing Macros were missing was the ability to check their own current state — to know whether they should be active at a given moment.
CheckIsActiveThis is where the new node CheckIsActive comes in. Its sole purpose is to let the macro body check if the macro is currently active. Just this node alone allows Macros to replicate the exact logic that Auras used for years.
There are many possible ways this kind of macro could look. Here’s just one example:

The idea is simple:
OnEnter) runs on entry.WhileActive) is actually a Repeat loop that runs every 250ms as long as the macro remains active.OnExit) takes over to handle any exit logic.In the near future, additional improvements will make creating "Aura-like" macros even easier.
Here’s another example – a macro that waits for deactivation and performs an action only on exit. This mirrors the behavior of an aura with just OnExit.

A whole set of nodes previously exclusive to Behavior Trees is now supported in Macros as well:
Note: The first three nodes (Selector/Sequence/Cooldown) are most useful inside a
Repeatblock — that’s where they shine.
Let’s build a simple rotation with two skills and a basic attack, using macros:

Nothing too special — we check cooldowns, then availability, then cast in order. If skills are unavailable, we fall back to a basic attack.
Now here’s the exact same logic, wrapped inside a macro:

The logic is nearly identical, except now we're building the rotation inside the macro itself with a loop, and using a Selector to control flow.
Side note: Looking at this screenshot, it seems like I went a bit overboard with icons and formatting — it’s a bit too "noisy". I’ll try to clean that up.
Finally — in the foreseeable future, macros will also be editable in a graph view. This feature is still in development, but many users may find it easier to understand and work with macros this way.

New instrument which allows to initialize hotkeys right from scripts.
[Keybind("p")] // Simple example - triggers when 'p' is pressed
[Keybind("Ctrl+2")] // Triggers only when 'Ctrl + 2' is pressed
[Keybind("Ctrl+2", IgnoreModifiers = true)] // Triggers on ANY combination containing 'Ctrl + 2' (e.g., 'Ctrl + Alt + 2')
public void OnKey(){
    Log.Info("Key pressed");
}

[Keybind(Hotkey = "4", SuppressKey = false)] // Handles the key, but it will still pass through to other apps
public void HandleKeyWithInjectedServices(IAuraEventLoggingService loggingService){
    Log.Info("Key pressed");
    loggingService.LogMessage(new AuraEvent(){ Text = "Message", Loglevel = FluentLogLevel.Info });
}
If you're using GetService somewhere in the code - you're already using DI system in EyeAuras.
I've made some improvements in that part which should simplify the scripts
Here is how exactly same script looks like in 3 different forms:
Current approach - get APIs via GetService
var sendInput = GetService<ISendInputScriptingApi>();
sendInput.MouseMoveTo(200, 100); // Moves the mouse to X200 Y100
sendInput.MouseRightClick(); // Performs a right mouse click
Now two new approaches which you could(and should!) start using in your scripts.
I am thinking about automatically injecting current APIs (such as SendInput) into your scripts - this would simplify and generalize the code.
E.g. for ISendInputScriptingApi the name would be SendInput (like in example below), for IPlaySoundScriptingApi - PlaySound, for ComputerVision that could be something like IComputerVisionExperimentalScriptingApi Cv { get; init; }
I will publish this as a separate update.
ISendInputScriptingApi SendInput { get; init; } // Automatically initialized when the script starts

SendInput.MouseMoveTo(200, 100); // Moves the mouse to X200 Y100
SendInput.MouseRightClick(); // Performs a right mouse click
Now
[Dependency] ISendInputScriptingApi SendInput { get; set; }

SendInput.MouseMoveTo(200, 100); // Moves the mouse to X200 Y100
SendInput.MouseRightClick(); // Performs a right mouse click
This is kinda huge. Implemented new experimental scripting API, which allows to work with EyeAuras Computer Vision without using Auras at all. All you have to do is write a few lines of code and all the tools built throughout the years are right at your disposal - image search, color search, neural networks, etc.
Note that this API is straight out of oven and is subject to change, not even mentioning bugs and problems - please send your reports
This is how your work with that new API could look like. For starters, lets find and image which is somewhere on the screen.
var cv = GetService<IComputerVisionExperimentalScriptingApi>()
    .ForScreen() //search through entire screen, could be ForWindow - see below
    .EnableOsd(fps: 10); //optional, with enabled on-screen-display refreshed @ 10 fps

var position = cv.ImageSearch(targetImagePath);
if (position.IsEmpty)
{
    Log.Info($"Found @ {position}");
} else {
    Log.Info($"Image not found");
}
That is it - no auras, no triggers, no actions. Everything is right there in these few lines of code. Under the hood, EA will try to optimize all your calls as much as possible, e.g. cache images, cache models, pre-load everything, etc. There is a lot of performance optimization work yet to be done in that area, but even the current state should be more than enough for most tasks.
Here is what we get from the get go:
Refresh()This is an example of a bot which tracks and clicks on image (using AimTrainer) Things to note on OSD:
60-80 hits/second :D
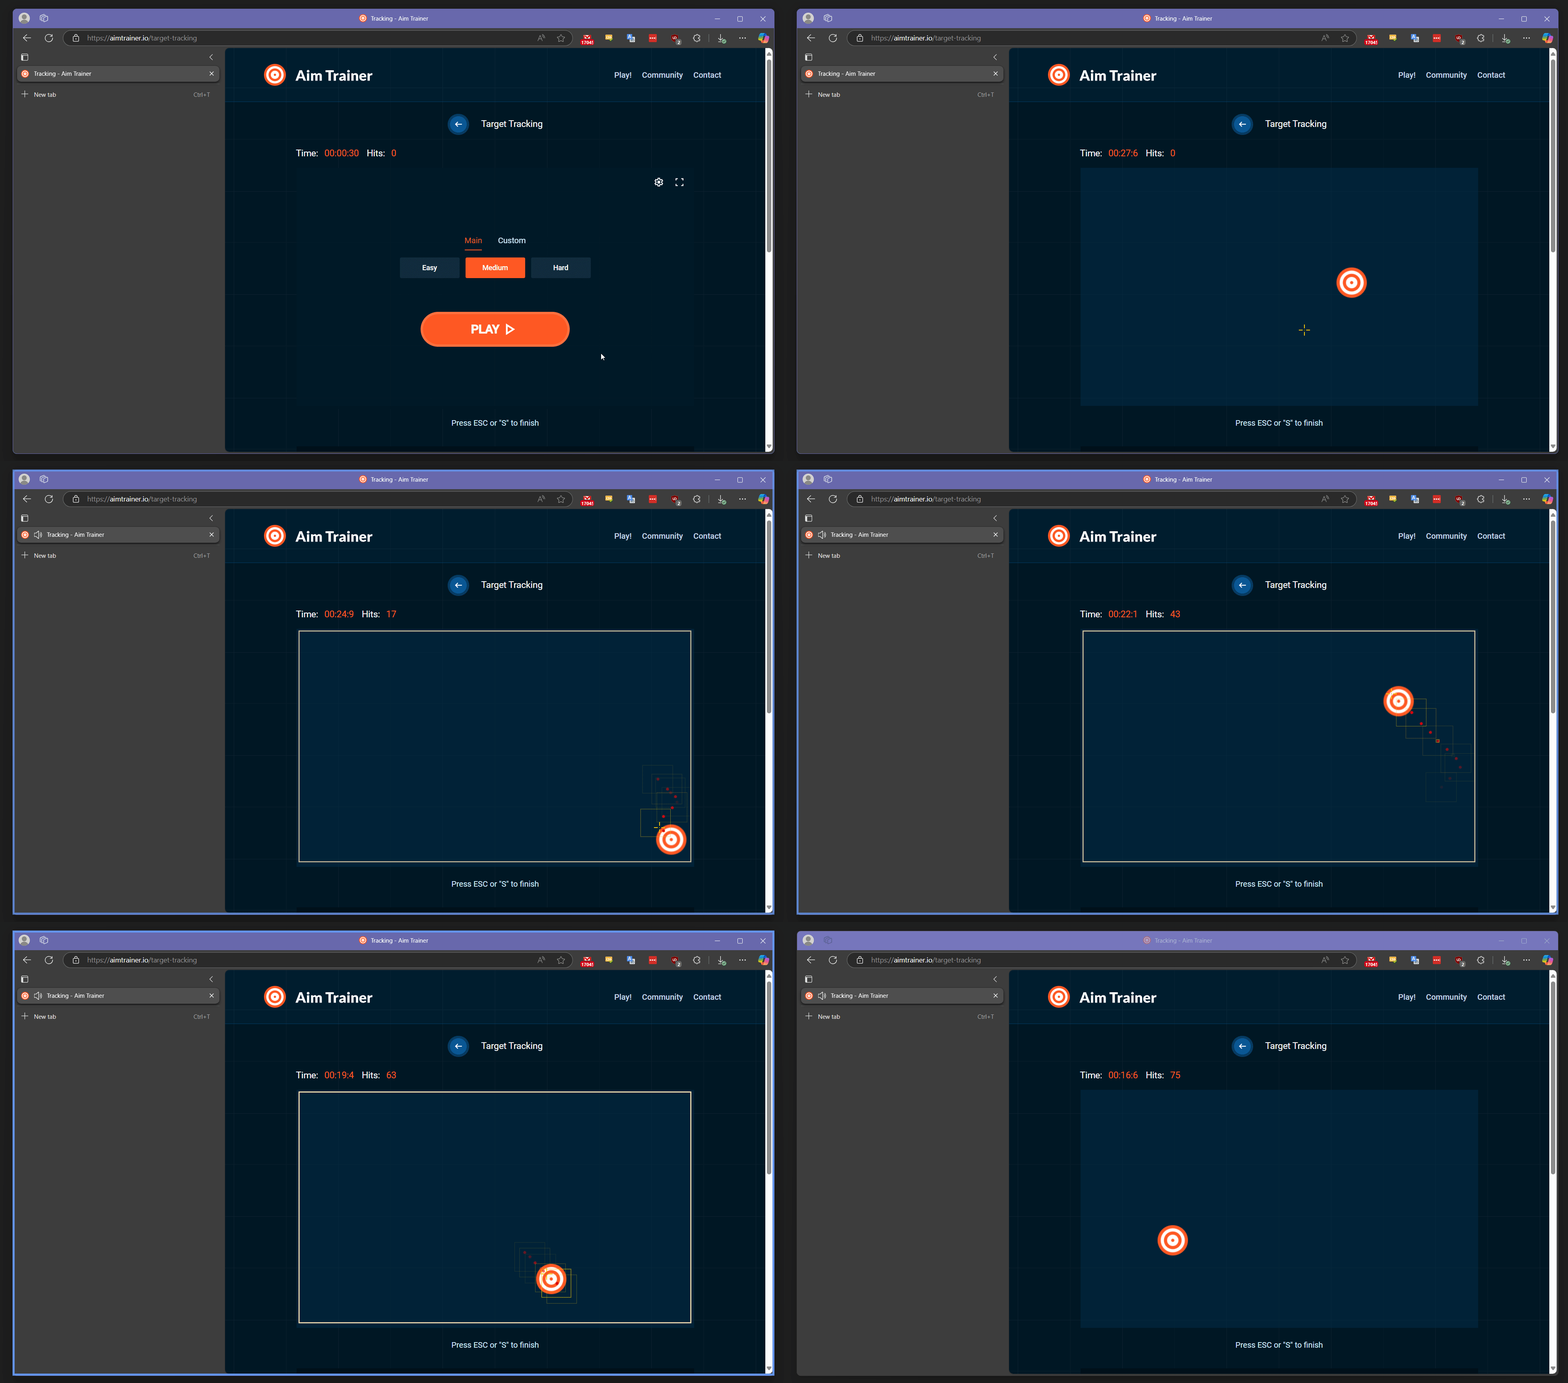
//this is an example of a script
//which uses image search to find and follow a specific image inside a window
//It uses 2-times probing for optimization - if we know the previous location of the image
//it makes sense to repeat the search in that specific region first

//picking a window
var windowSelector = GetService<IWindowSelector>();
windowSelector.TargetWindow = "Aim Trainer";
var targetWindow = windowSelector.ActiveWindow ?? throw new InvalidOperationException("Window not found");

//this API is used to do Computer Vision stuff (image/text/color/ml search)
var cv = GetService<IComputerVisionExperimentalScriptingApi>()
    .ForWindow(targetWindow)  //for a specific window
    .EnableOsd(fps: 10); //with enabled on-screen-display refreshed @ 10 fps

//this API is used to generate mouse movements
var sendInput = GetService<ISendInputScriptingApi>();
sendInput.TargetWindow = targetWindow; //for a specific window

//could be either local file or URL
var targetImagePath = @"C:\Users\Xab3r\Documents\ShareX\Screenshots\2025-03\uupb4m3RQkfHa8sv.png";

//repeat until script is stopped
while (true)
{
	  //try to find the image
    var position = cv.ImageSearch(targetImagePath);
    if (position.IsEmpty)
    {
        //not found
        continue;
    }

    Log.Info($"Found @ {position}");

    //found the image - moving the mouse to the center and clicking on object
    sendInput.MouseMoveTo(position.Center());
    sendInput.MouseClick();
}
or, alternatively, this is how the same loop could look like using neural network. ML is expected to be used by more experienced users, currently the method returns raw result in a form of WindowImageProcessedEventArgs - it provides maximum possible amount of control over extracted data
//as with the image, model path could be local or could point to remote file
var mlModelPath = @"https://s3.eyeauras.net/media/2025/03/AimLab_20240213193604OOBfW2f00U5K.onnx";
while (true)
{
    //get predictions from the model
    var result = cv.MLSearchRaw(mlModelPath);
    if (!result.Detected.Predictions.Any())
    {
        //not found
        continue;
    }

    var currentPosition = result //WindowImageProcessedEventArgs
      .Detected //get detection results
    	.Predictions //get predictions
    	.First() //more specifically, first one
      .Rectangle //get bounding box of that prediction IN LOCAL(aka World) coordinates
      .Transform(result.ViewportTransforms.WorldToWindow); //transform World coordinates to Window coordinates
    Log.Info($"Found via ML @ {currentPosition}");

    if (!currentPosition.IsEmpty)
    {
        //found the image - moving the mouse to the center
        sendInput.MouseMoveTo(currentPosition.ToWinRectangle().Center());
        sendInput.MouseClick();
    }
}
Alongside the new api, we needed more convenient tools which would allow to work with it. The main idea of those is that you use them to get some values which could then be inserted into the code, be it coordinates, color, window title or process name. This should greatly speedup process of development, especially for smaller scripts.
The list includes:

var pixelLocation = cv.PixelSearch(Color.FromArgb(26, 26, 26)); //<- Color.FromArgb(26, 26, 26) inserted by Color selector
var cv = GetService<IComputerVisionExperimentalScriptingApi>().ForWindow("l2.bin"); //<- "l2.bin" inserted by Process selector
cv.MLSearchRaw(mlModelPath, new Rectangle(719, 406, 988, 584)); //<- new Rectangle(719, 406, 988, 584) inserted by Region selector
sendInput.MouseMoveTo(new Point(190, 393)); //<- new Point(190, 393) inserted by Point selector
When you work with coordinates, do not forget that those could be either absolute(screen) or relative(window). Depending on use-case, one or another could be preferential. New tools support both - there are 2 different kinds of instruments, use at your own discretion.

SendInputUnstableScriptingApi to SendInputScriptingApi - there were no changes for almost a year, looks stable enoughPercentage which could be used to denote that the value is in % (e.g. 0.1 = 10%)OpacityWorldToWindow transformation matrix to WindowImageProcessedEventArgs - this allows to very easily calculate in-window coordinates after Refresh()R and G color channels were swappedMajor changes in how EyeAuras manages memory for the images. May make things better, may break everything - we'll see.
For a demonstration purposes and for some quick testing, added selector which allows you to download one of well-known Yolo models, including those which feature Segmentation and Classification. Selector is available only when model is NOT loaded.

E.g. here are results of Yolo 8 Small - Segmentation

and here are results of the latest Yolo 12 Turbo - Small - notice that even Turbo version nowadays not only yields more reliable results, but it also is able to detect more objects(person in the car) on the scene. Thank you, progress :)

When you're using ML model, it usually has hard-coded resolution, e.g. 640x640.
When ML model gets fed with an Image, that image must be resized to accomodate model's resolution - there is no other way around it.
Depending on how the training process is done, usually it is either Letterboxing (adding black bars without changing aspect ration) or Stretching.
Previously, EyeAuras was trying to "guess" the best method depending on model type and version, but this introduced more confusion than helped.
That is why, from now on, default resize method is Stretching and if you want to change that - just throw in Resize effect and pick whichever method fits your model best.
Open Effects window

Added Resize Effect and setup it accordingly to your model resolution/type

Added new option, which intends to do two things:
1) Try to lower entry bar for new users Practice has shown, that many new users, given link to pack's page, instead of downloading the pack, which would contain compatible version of EyeAuras and scripts, choose to download standalone version and Import pack manually. This could lead to a lot of problems, such as:
Alpha version and user downloaded Stable - most of the time Stable is not compatible as it is older and has less functionality2) Simplify packs support for authors If authors are 100% sure, that users are using a specific portable version of EA, it makes things easier for them to debug and troubleshoot. This should make things more supportable long-term.
Any -> If set, users can either Import the script or Download PackPrefer Packed - If set, users can either Import the script or Download Pack, but there will be focus on downloading packed versionPacked Only - If set, users can Download Pack, but Import in any form is not allowed
There is no loss of functionality, everything is still editable via EyeAuras UI
Previously, it was possible to edit Packaging option on both EA desktop app and on the website as well (application name, config options, etc). I am changing how the packaging works in general and to make things more stable, I've disabled editing pack options on the website.
This may come back in the future, but for now, the primary way of editing Packaging Options is via EyeAuras UI

This is a new functionality in scripting subsystem which allows you to embed custom files right into EyeAuras - CSS/JS/Markdown/etc.
This will allow you to use custom JS/CSS in your BlazorWindows, some configuration/data files, bring up custom DLLs, etc.
Here is an example: https://wiki.eyeauras.net/en/scripting/examples/basic/file-provider
(README.md is a custom file added to the script)
//built-in FileProvider which allows to access script environment files
var fileProvider = GetService<EyeAuras.Repl.IScriptFileProvider>();

var files = fileProvider.GetDirectoryContents("/");
Log.Info($"Script files:\n\t{files.DumpToTable()}");

var readmeContent = fileProvider.ReadAllText("README.md"); //or fileProvider.GetFileInfo() to get access to raw data
Log.Info($"README:\n{readmeContent}");
For the next few weeks only subset of all file types will be supported. As soon as I'll be sure that the system works, support will be extended and any arbitrary file could be embedded into your script and will be available to use right from your code.